Friday, March 8, 2019

How to change default lock screen image in Windows 10

How to change default lock screen image in Windows 10

In Windows 10, the lock screen image is shown in a number of cases. For instance, if you locked your user session using Win+L or by clicking the user image in the Start Menu, the lock screen image will appear and show the image which is set in your Settings -> Personalization -> Lock screen. But if you sign out or the screen is locked at the user list screen, then Windows 10 shows another image. This is the default lock screen. So, there are two completely separate lock screens in Windows 10. Here is how you can set the default lock screen image in Windows 10.

When you sign out from your Windows 10 user session, after one minute the default Lock screen image appears. If you enable the Ctrl + Alt + Del sign in requirement, it will appear instantly.
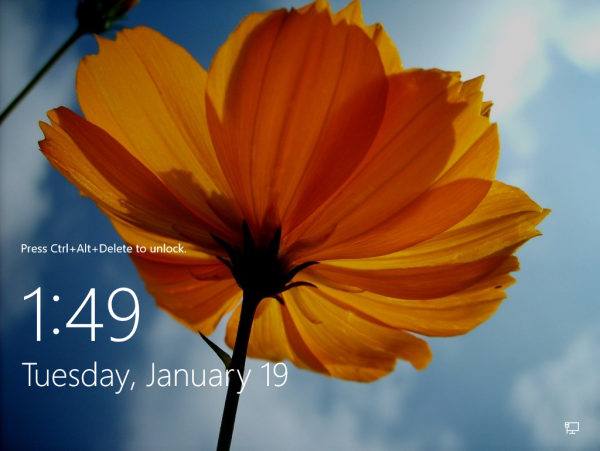
Here is how the lock screen image for my user account looks like:Windows 10 per-user lock screenWindows 10 control alt del login screen
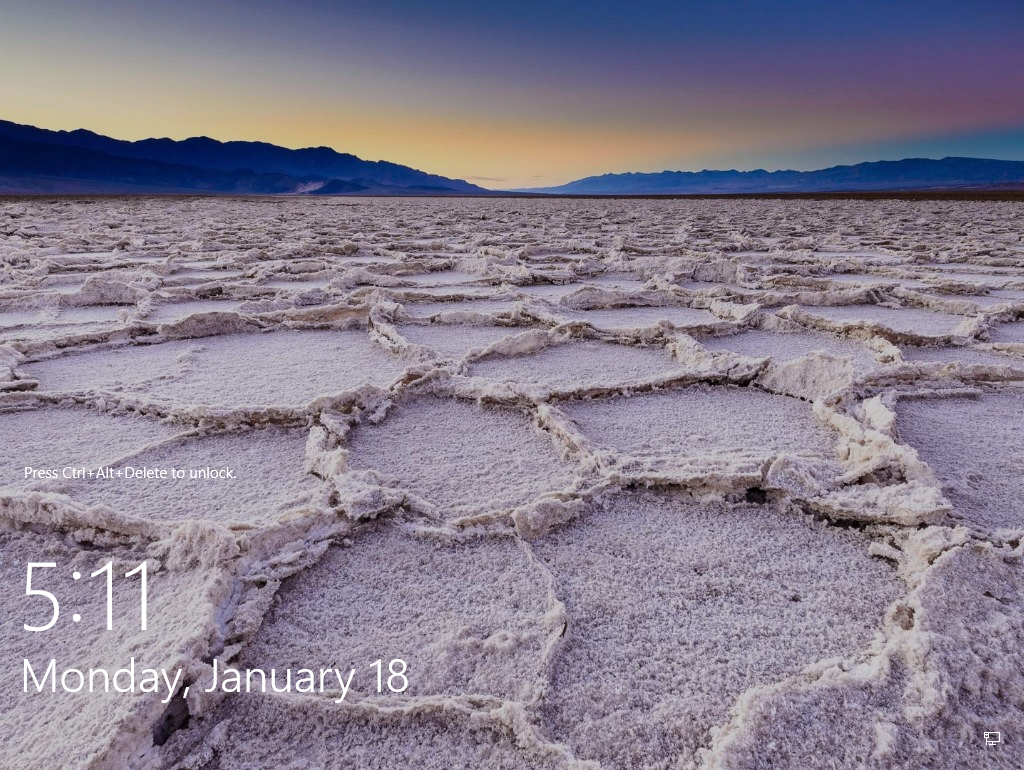
And this is the default lock screen image set in my Windows 10:Windows 10 default lock screen
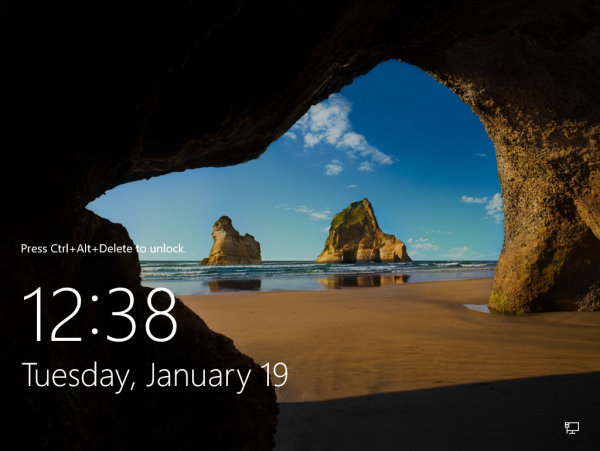
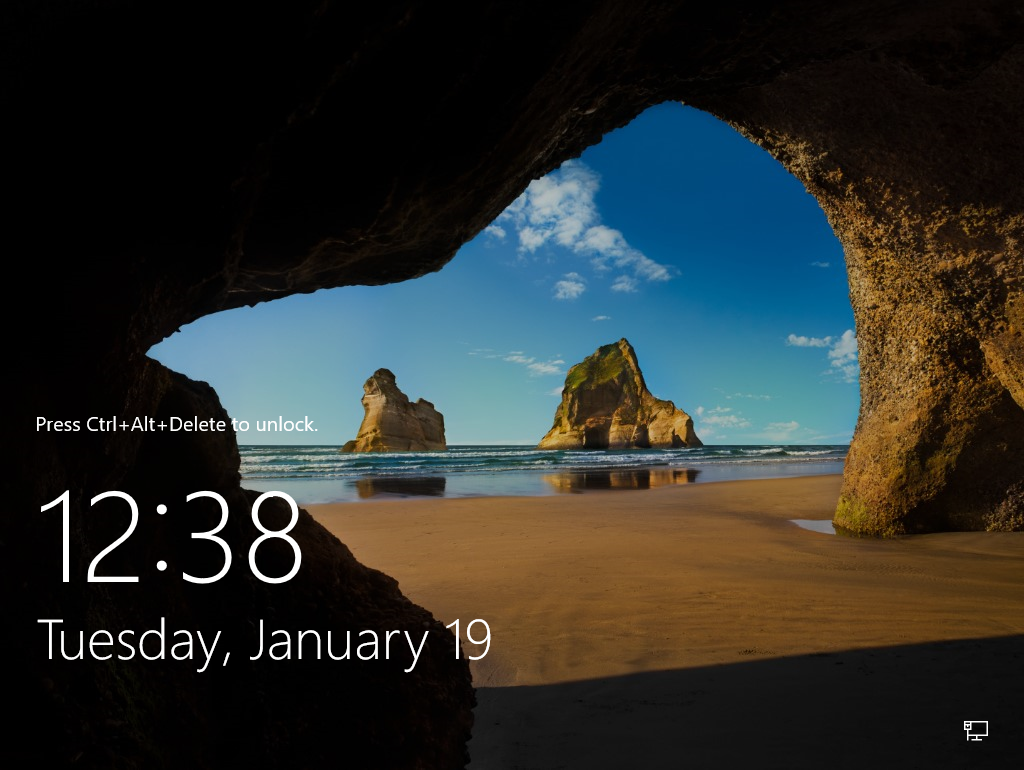
As you can see from the screenshots above, they are two different images.
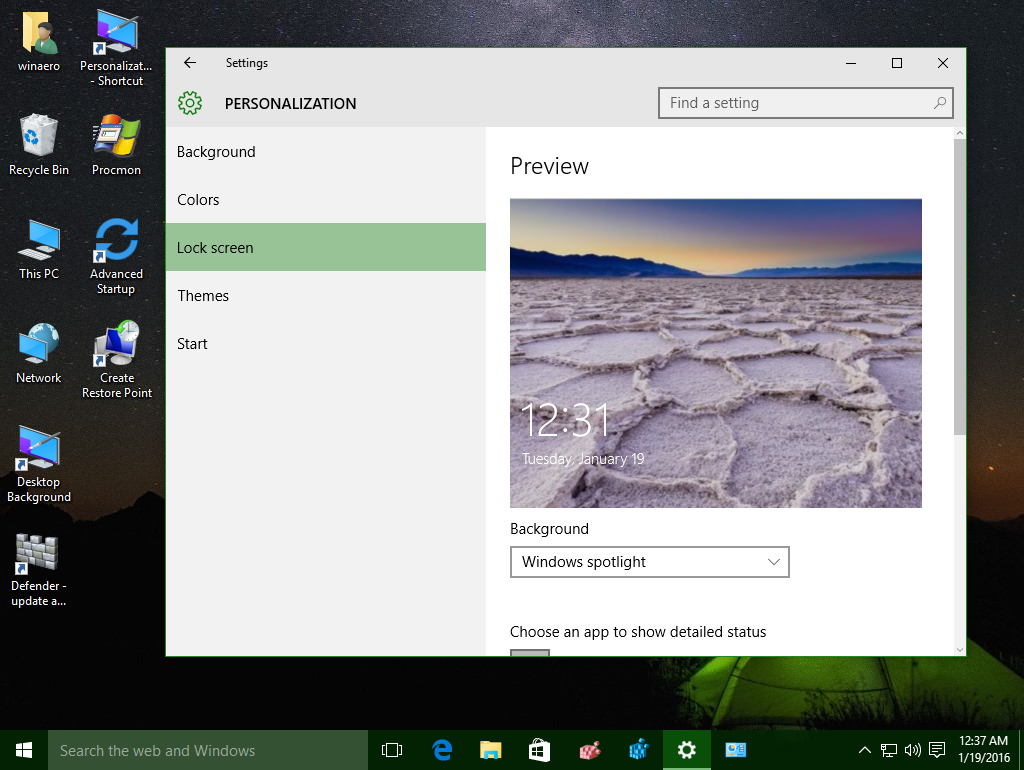
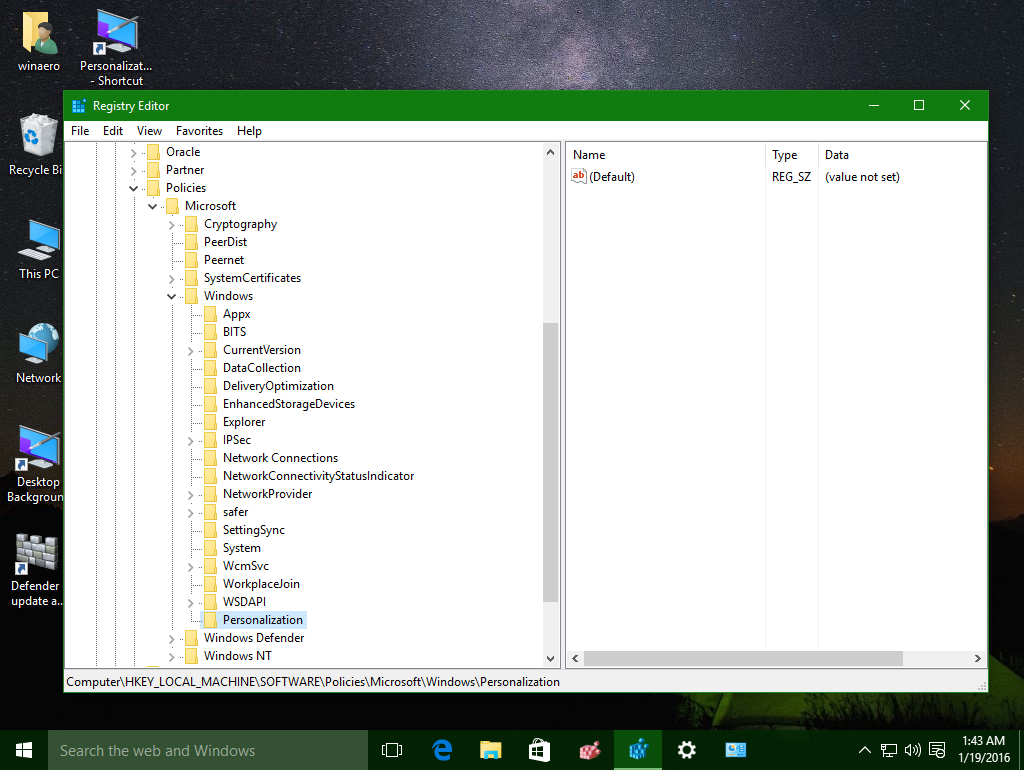
Unlike the per-user lock screen image, the default one cannot be changed using the Settings app. Here is how to change default lock screen image in Windows 10.
It can be done with a simple Registry tweak. Just do the following.
  1. Open Registry Editor
  2. Go to the following key:
    HKEY_LOCAL_MACHINE\SOFTWARE\Policies\Microsoft\Windows\Personalization
    Tip: How to jump to the desired registry key with one click.
    If you have no such key, then just create it.Windows 10 create personalization policy reg key
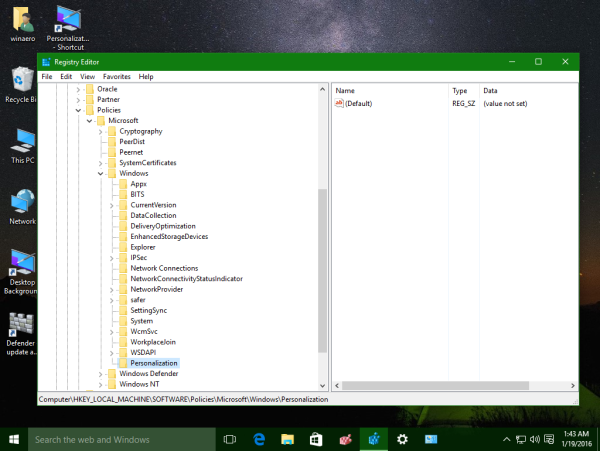
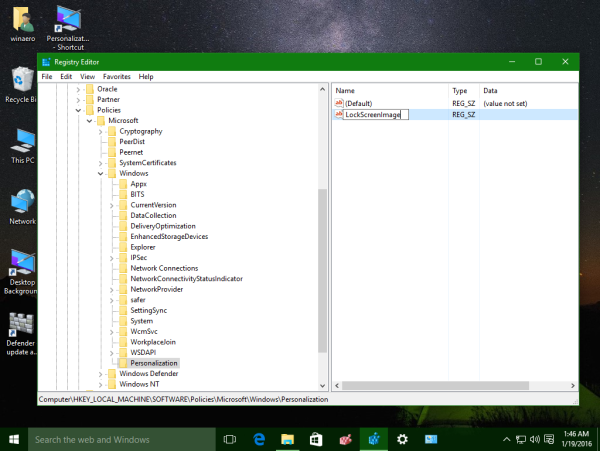
  3. Create a new string value named LockScreenImage.Windows 10 create lockscreenimage valueSet its value data to the full path of the desired image which will be used as the lock screen image:Windows 10 set lockscreenimage value
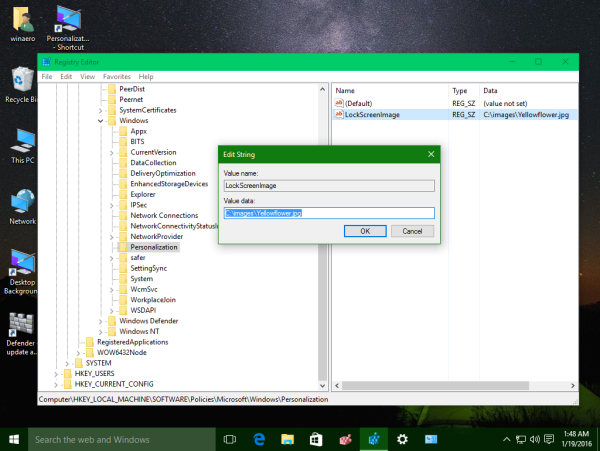
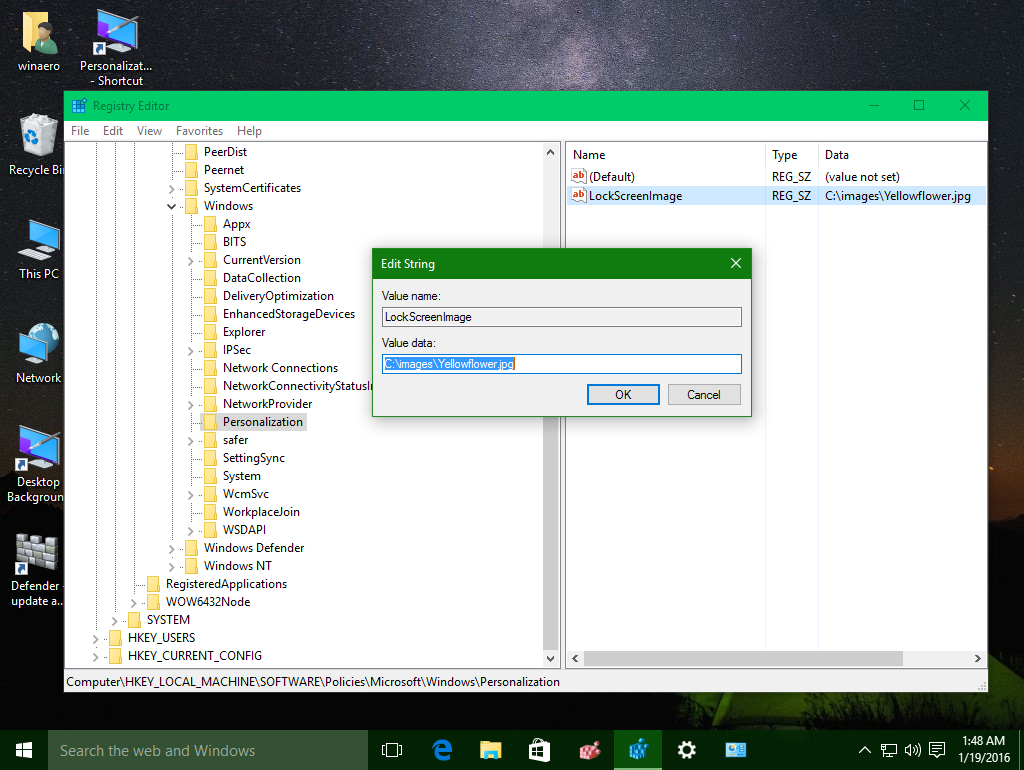
Now the default lock screen background will be set to the specified image:Windows 10 custom default lock screen image

Install Cisco VPN Client on Windows 10


Install Cisco VPN Client on Windows 10


Install-Cisco-VPN-Client
To install  Cisco VPN Client on Windows 10 a little bit different.  Today we will look at installing Cisco VPN Client on Windows 10.
Please follow steps below :
1. Download Sonic VPN software from this link  and  install  the Sonic VPN software   to computer.
2.Reboot your computer
3. After that download  Cisco VPN Client software from this link and  install 32-bit or 64-bit the Cisco VPN Client software. I would recommend that you run the vpnclient_setup.MSI file.
4.  now we need to make some changes on registry:
  •  Open Registry editor regedit in Run prompt
  • Navigate to the Registry Key HKEY_LOCAL_MACHINE\SYSTEM\CurrentControlSet\Services\CVirtA
  • Select the Display Name to modify, and remove the leading characters from the value data value as shown below:
– For x86 machine,  the string “@oem8.inf,%CVirtA_Desc%;Cisco Systems VPN Adapter” to just “Cisco Systems VPN Adapter”
– For x64 machine, the string ”@oem8.inf,%CVirtA_Desc%;Cisco Systems VPN Adapter for 64-bit Windows” to just “ Cisco Systems VPN Adapter for 64-bit Windows”
5. Reboot your computer and your cisco vpn client will be run successfully.

Bitlokcer Invalid Namespace Error

                                           Image result for Bitlocker Invalid Namespace


solving Bitlokcer Invalid Namespace Error


When activating Windows Bitlocker on a new Thinkpad laptop, there is an error: Invalid namespace.
You can use the command "manage-bde -status" to get the BitLocker status on the machine.
Basically, an invalid namespace error indicates that the namespace you are trying to modify is not exist in WMI.
To solve this issue, we can re-register the BitLocker WMI (win32_encryptablevolume) class.
Start- Run - mofcomp.exe win32_encryptablevolume.mof
If the MOF file successfully compiles you will receive the following message:
Microsoft (R) MOF Compiler Version 6.1.7600.16385
Copyright (c) Microsoft Corp. 1997-2006. All rights reserved.
Parsing MOF file: win32_encryptablevolume.mof
MOF file has been successfully parsed
Storing data in the repository...
Done!

Error 2:Class, instance, or property '' was not found.

Some people will receive another error: "Class, instance, or property '' was not found."
This time, we need to rebuilding the WMI Repository.
1. Save the below code to a notepad, and save it to "Repository.bat".
2. Right-click the bat file, choose "Run as Administrator"
3. After successful rebuild, re-register the Bitlocker WMI again by:
Start- Run - mofcomp.exe win32_encryptablevolume.mof
4. If the MOF file successfully compiles you will receive the following message:
Microsoft (R) MOF Compiler Version 6.1.7600.16385
Copyright (c) Microsoft Corp. 1997-2006. All rights reserved.
Parsing MOF file: win32_encryptablevolume.mof
MOF file has been successfully parsed
Storing data in the repository...
Done!
Finally the Bitlocker run success.
bitlocker2

Microsoft Exchange 2016 vs. Office 365: Email difference

In the arena of Microsoft email servers, two options are available for customers to manage their internal written communication: Exchange Server 2016 and Office 365.
Exchange_vs_Office365.png
Each has its own advantages and implementation challenges and finding the right one to fit the company can sometimes be daunting. Boiled down, the main difference is one is a self-hosted system (Exchange 2016) and the other is cloud based (Office 365).
Both services provide the same functionality: email communication, calendar and meeting scheduling, and contact management. The key difference between the two is control.
Exchange 2016 is a self-hosted software package running on Windows networks and residing on a company’s own hardware. It requires an investment of both hardware infrastructure and software licensing. The total Exchange solution is a decently-equipped server running Windows Server with Exchange 2016 installed. Each client on the system can use the web-based Outlook Web Client (OWC) or connect via Microsoft Outlook (a part of the Microsoft Office Suite of applications) or via a IMAP- or POP-enabled client.
In addition to purchasing the server with Windows and Exchange 2016 installed, a client license is required for both Windows and Exchange mailbox for each user connecting to the server. These are just the hard costs associated with the server. There are various soft costs that have to be factored in as well. Finding a skilled IT professional with Exchange experience adds to the bottom line when managing the environment. This can be fairly pricey for small businesses to pony up just to get email flowing into their company.
A number of years ago, Microsoft recognized this cost limitation for businesses and built a subscription-based model to their popular email server called Office 365. A simple, monthly subscription is all that is required for users to have a mailbox for their company and the server is hosted at Microsoft and managed by Microsoft professionals. The management of a company’s email server is now an easy task — simply creating users and assigning passwords. Most companies that run Office 365 do not have a dedicated network engineer for email management any longer. The server is robust and scalable and always online and, best of all, updates and upgrades are managed by Microsoft.
Most Office 365 subscriptions come with the latest Office Suite to be loaded by the end users. This includes Word, Excel, PowerPoint and Outlook so standardizing by the company on the Office 2016 platform can happen in a cost-effective manner.
Converting a company from an older Exchange server or an external, non-Microsoft service to Office 365 can be performed easily

Monday, January 28, 2019

Find windows 8/10 product key using PowerShell

Get Windows License Key using PowerShell

In this post, we will see how to find the original Windows Product Key using Command Prompt 


To find your Windows 10 Product Key, open a PowerShell window with administrative privileges, type the following command and hit Enter:

powershell "(Get-WmiObject -query ‘select * from SoftwareLicensingService’).OA3xOriginalProductKey"
find windows product key
Your Windows license key will appear! This will work on Windows 10/ 8.1.

Find windows 8/10 product key using CMD

In this post, we will see how to find the original Windows Product Key using Command Prompt 

Recover Windows product key using Command Prompt

oem-key-windows
From the Win+X Menu in Windows 10 / 8.1/8, open an elevated command prompt window run as administrator , type the following command and hit Enter:
wmic path softwarelicensingservice get OA3xOriginalProductKey
Your Windows product key will be displayed.

Note: this command works on OEM base machine.


what is mean by OEM?

original equipment manufacturer (OEM) is a company that produces parts and equipment that may be marketed by another manufacturer.i.e prinstall Operating system.

How to change default lock screen image in Windows 10

How to change default lock screen image in Windows 10 In Windows 10, the lock screen image is shown in a number of cases. For instance,...